SALT BATH ANNEALING - DOES IT WORK?
Alex Findlay - 17/05/2019
Copyright AMP ANNEALING 2019
MOLTEN SALT BATH ANNEALING – DOES IT WORK?
In the course of our R&D, we have tested other methods of annealing. We have never seen fit to comment on any of the other systems which can be used for annealing brass. Rather, we prefer to focus on the positive outcomes of using our Annealing Made Perfect induction system. However, we have recently noticed that a process called molten salt bath annealing is gaining considerable attention. The claims of accuracy and ease of use are impressive. We have not been able to find any evidence to back up these claims, so naturally we have run our own tests. The results we got were very surprising, and for us, rather intriguing. What started out as a simple one-day test turned into a much deeper rabbit hole which has taken several weeks. We believe it is important for anyone considering this method to be aware of our tests.
Introduction:
What is correct annealing?
This is a subject we have tested extensively.
Over the last four years we have hardness tested literally tens of thousands of cases, in particular in the neck and shoulder region. We test for hardness because that is what matters. We do not focus on temperature at all.
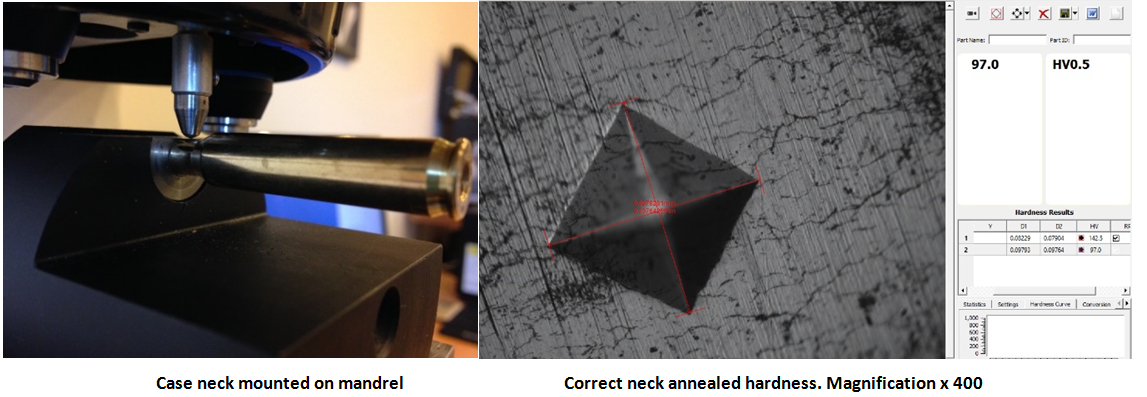
Hardness testing of cartridge brass is done with a micro-Vickers hardness testing machine. Testing is performed by indenting the brass sample with a diamond anvil under a known load. For brass tests this is usually 500 grams. The larger the diamond indent, the softer the brass. The diagonals are measured to 0.001 mm. This method is very accurate, and is used in virtually all metallurgy laboratories. Hardness on the Vickers scale is shown as HV. The larger the HV number, the harder the brass i.e., a larger diamond gives a smaller HV number.
The indent can be applied to the outside of the neck, as seen in the left had photo below.
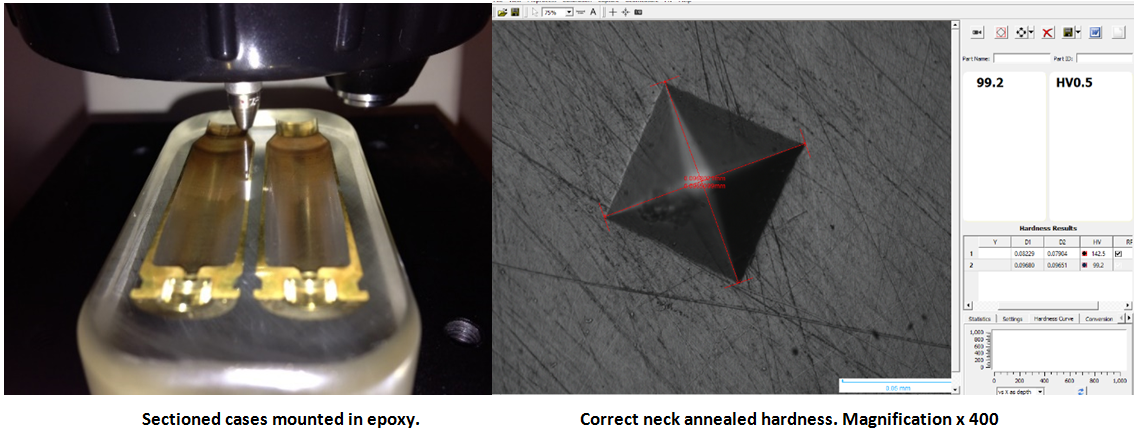
Alternatively, samples can be sectioned and mounted in epoxy resin as shown in the left-hand photo below. This method is more commonly used and it allows a transverse hardness plot along a sample.
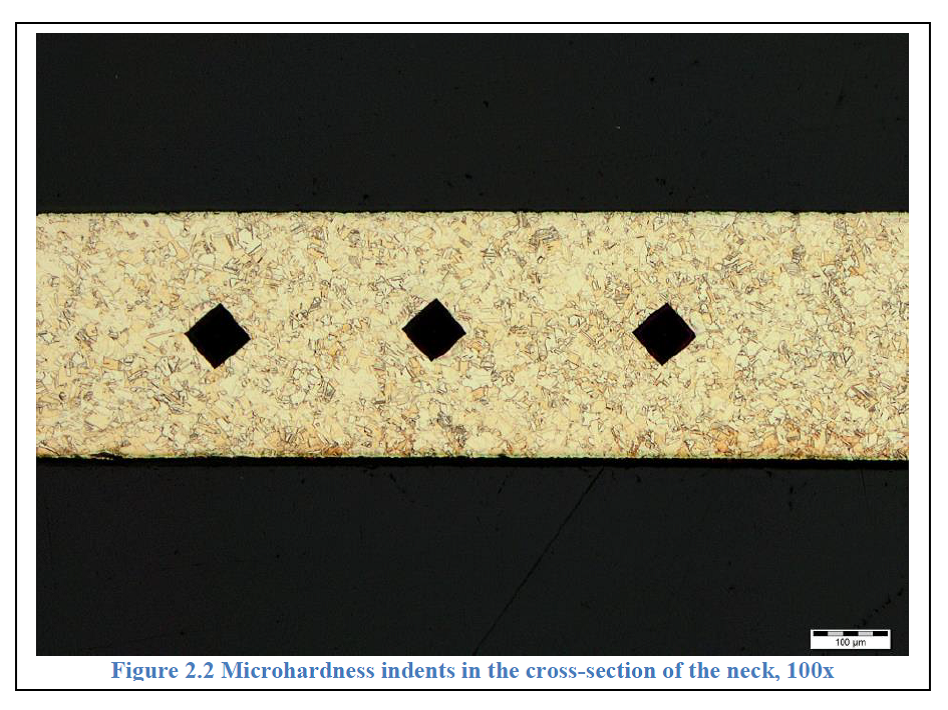
The photo below shows a transverse plot along a case neck under just 100 X magnification.
Annealing, as it relates to brass is a fairly loose term. Over time, case necks can easily work harden as high as 180 HV – 200 HV. Any heat treatment which reduces that hardness is arguably "annealing”. Precision reloading requires much more specific outcomes.
We can say with some certainty that optimum annealed neck hardness is 95 HV – 100 HV. This also happens to be the neck hardness of most virgin Peterson, Lapua and Norma brass. At Annealing Made Perfect we advise that cases should be annealed every reload. The correct hardness gives repeatable neck tension and resizing consistency, ensuring that spring back is eliminated in the neck and shoulder. In addition to our own testing, we have benefitted from the feedback of hundreds of the world’s best competitive shooters who are our customers. As annealed neck hardness creeps up to 110 HV, the accuracy benefit of annealing diminishes. Between 110 HV and 120 HV there is practically no benefit apart from partial stress relief of the brass. This may help a little with case longevity. Over 120 HV neck hardness, almost nothing is achieved.
Molten Salt bath test:
Claims as of May 2019 (When this article was written):
1. That the optimum temperature for annealing brass cases by this method is 500°C.
2. That any case from the smallest – say 223R right up to 50 BMG will be annealed correctly by inserting the neck and shoulder to a controlled depth into the molten salt for 5 seconds.
3. Furthermore, temperature is not critical. Anywhere up to 550°C will work just fine. In addition, the method is not time sensitive. Insertion into the molten salt for up to 8 seconds will still result in a correct anneal.
Equipment: All that is needed to set up is:
· Lee electric melter (as used for lead bullet casting)
· The correct salts (potassium nitrate KNO3 and sodium nitrite NaNO2 mixed 50:50)
· A digital thermometer with thermocouple
· A jig to position the cases correctly in the salt bath.
All of this can be purchased for a minimal investment, reportedly making this method not only the best and easiest to use annealing system, but also the cheapest.
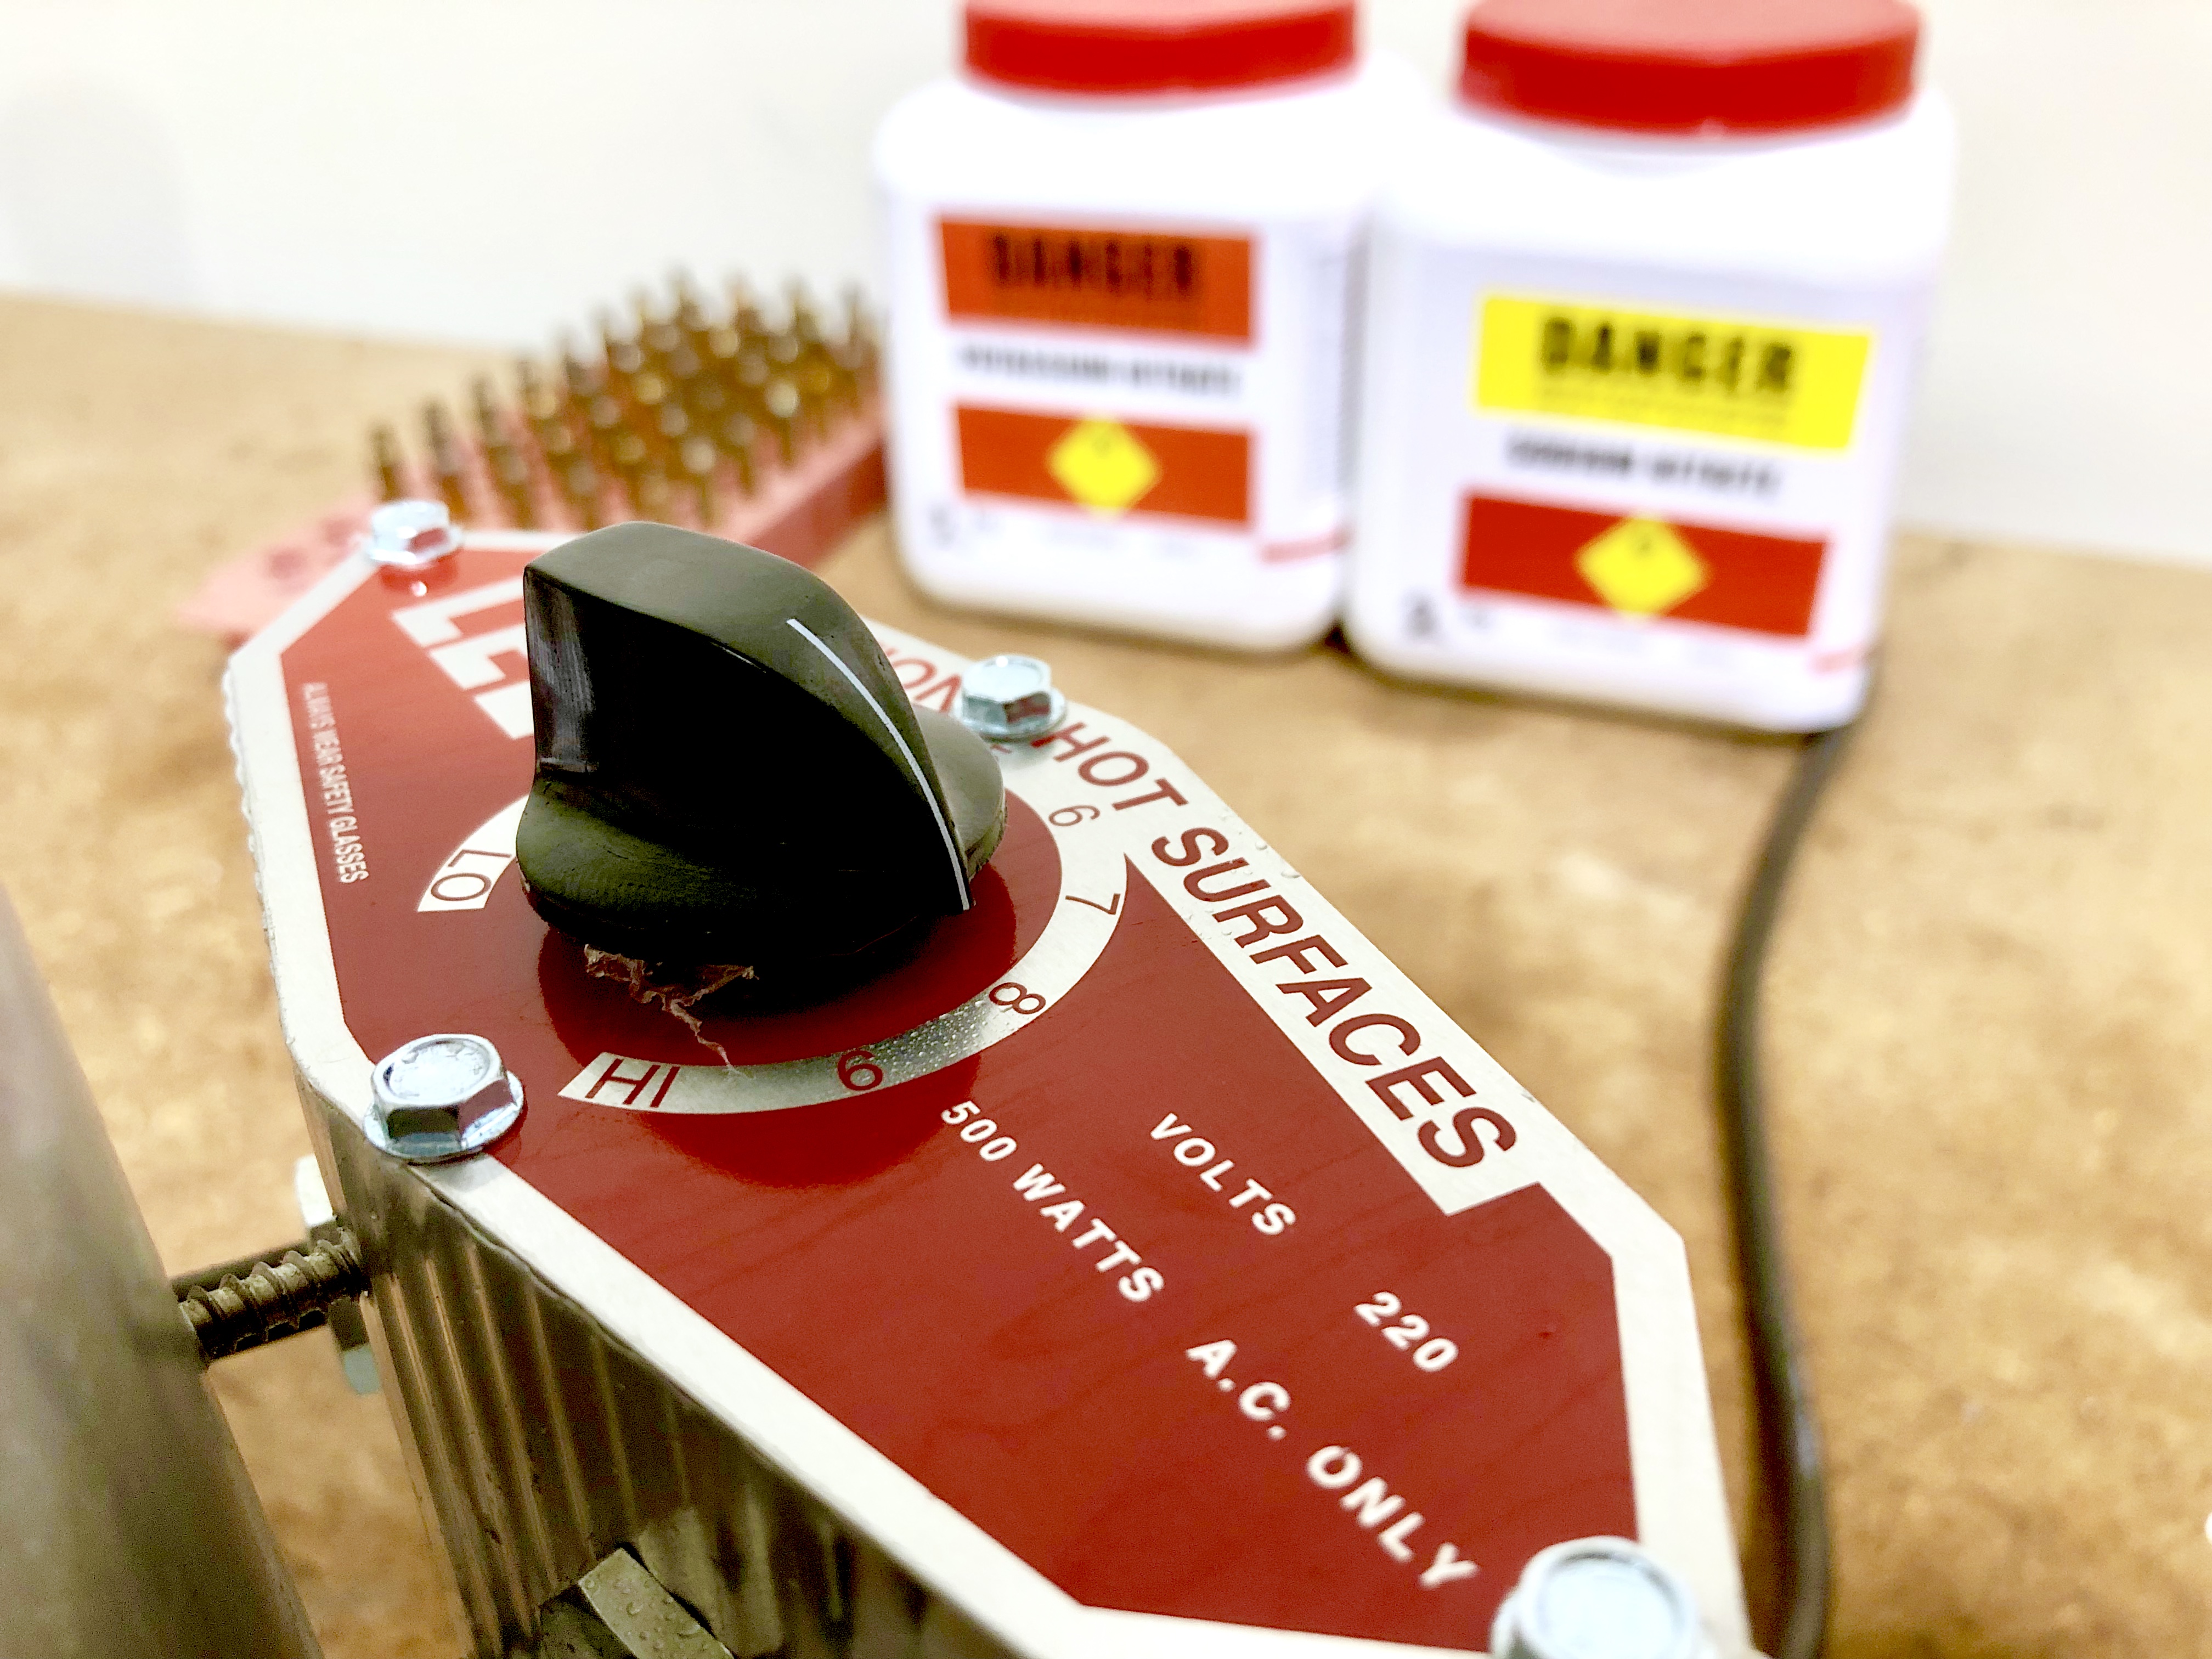
We purchased a Lee Pro Pot IV 220V, 500-watt, 2 Kg of each salt, and a digital thermometer as specified.
All cases used in our tests were de-primed before salt bath testing.
For all the following tests, we took nine hardness measurements along each case. As shown below, reading 1 is at the case mouth. 2 is mid-neck. 3 is at the rear of the neck. 4 is forward shoulder. 5 is rear shoulder. 6 is front body. 7 is +3 mm. 8 is + another 3 mm. 9 is + another 3 mm. The spacings between position 1 and position 6 vary depending on the size of the case.
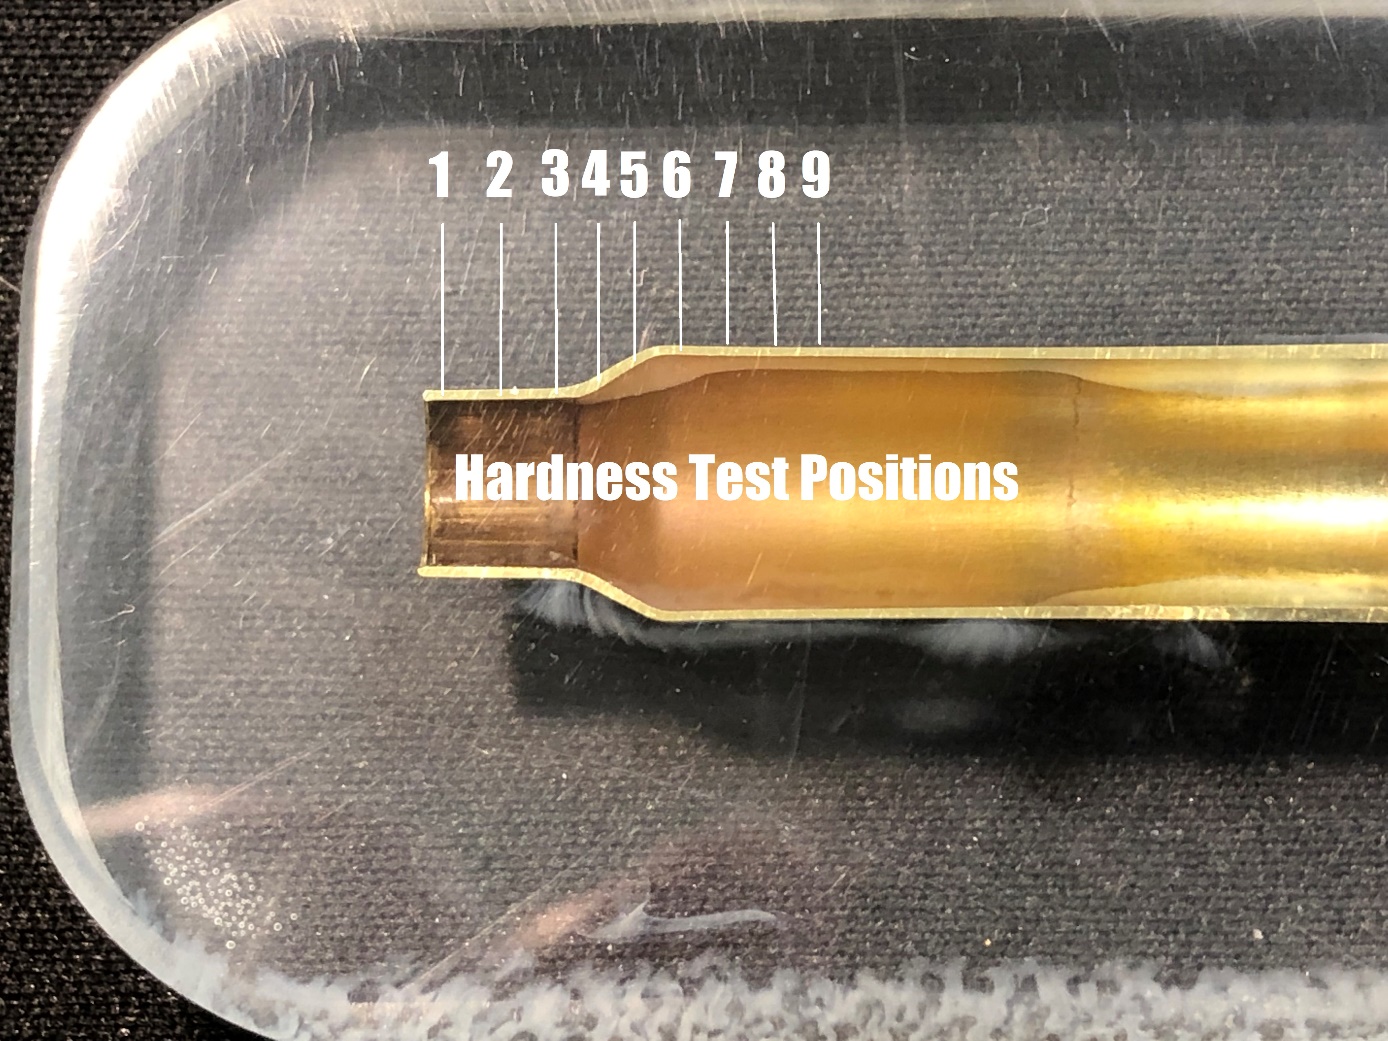
Hardness test positions.
As a reference, this is a graph of virgin Norma and Lapua 223 cases, together with a "Target Anneal” which we use for all our calibrations.
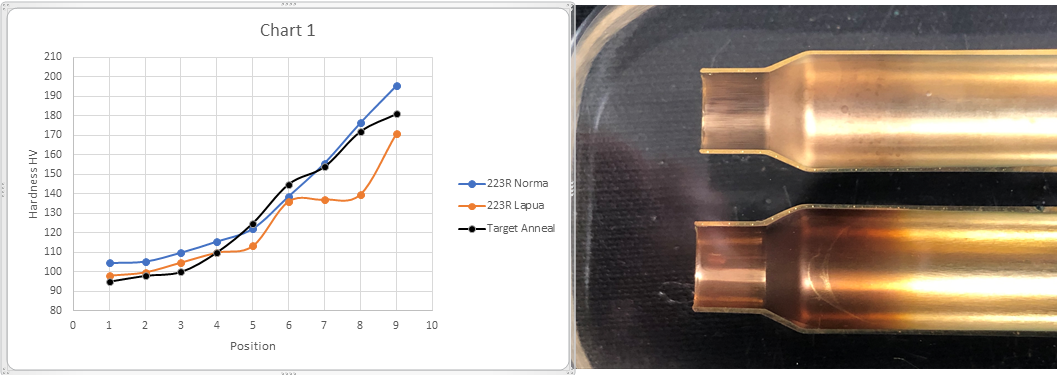
All three plots are very similar. As can be seen, from the neck back through the shoulder and into the body, the case should get progressively harder. Ideally the shoulder (positions 4 and 5 in the graph) should range from 110 HV up to 130 HV nearing the shoulder/body junction.
Moving into the body (positions 6 – 9), the case should harden further from around 140 HV then up to 180 HV+. The Lapua case shown here is annealed a little further along the body than the Norma case. From position 9 back, both cases were +185 HV, which is to be expected.
First test using molten salt:
Our initial testing was done using virgin Norma 223R cases. This is the standard brass we use to calibrate every annealer we make. For these tests, we passed each case through a standard Hornady neck die with expander. This gave each case a neck hardness of 140HV – 145HV. (The shoulders and body were unchanged from virgin).
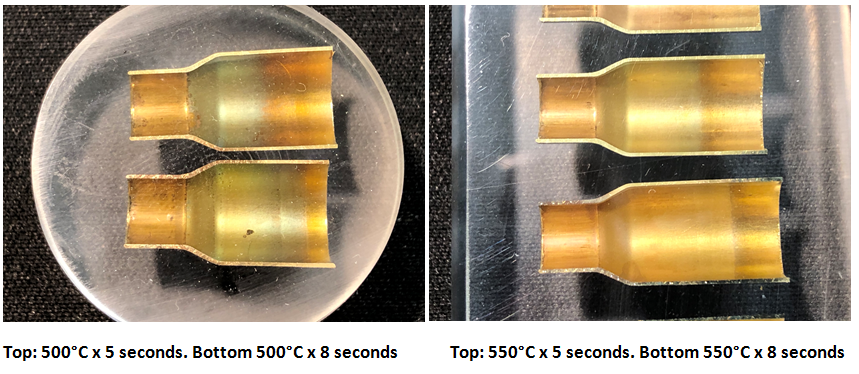
We then inserted the first case into the 500°C molten salt to a depth so that the neck, shoulder and 5 mm of body were in the liquid. Time was 5 seconds. As instructed, the case was promptly dropped into a bucket of water and allowed to dry. Visually, the case displayed the classic discoloration normally associated with annealing, although in practice, we have found this to be a poor indicator and believe it is more probably the oxide layer reacting with the heat and discoloring as a result.
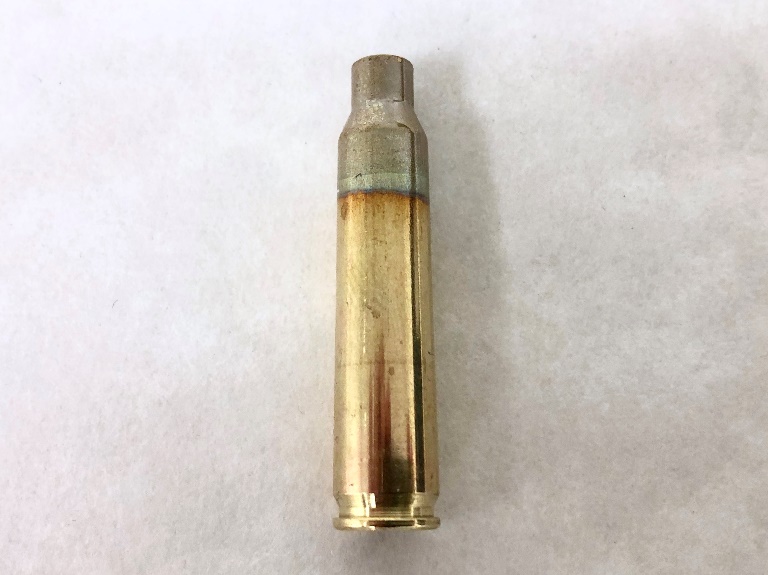
5 seconds @ 500°C
We then polished the neck so that micro-Vickers hardness testing could be performed on a mandrel. Two readings gave 138HV and 133HV. These readings suggest that an effective reduction in hardness was not achieved.
Because annealing is a product of temperature and time, we then increased the temperature to 525°C and tested a second work hardened case for 5 seconds. This gave two readings of 130HV and 138HV indicating almost no change from the previous temperature setting.
We then increased the temperature to 550°C. This took some time, and seemed near the maximum temperature the pot could achieve. A third case was inserted for 5 seconds. It gave 133HV and 131HV. Again, no practical reduction in hardness was observed.
The advice from industrial publications (referenced at the bottom of this article) was not to exceed 550°C, At higher temperatures, nitrate salts decompose and may cause fire or explosion.
The melt pot didn’t seem like it could go much hotter anyway. We then increased the time of insertion to 8 seconds at maximum temperature. A fourth case was inserted, quenched and tested.
Two readings gave 126HV and 123HV. While a slight reduction in hardness was observed it was still not within the range of harness we would expect from a satisfactorily annealed case as per the chart 1 above.
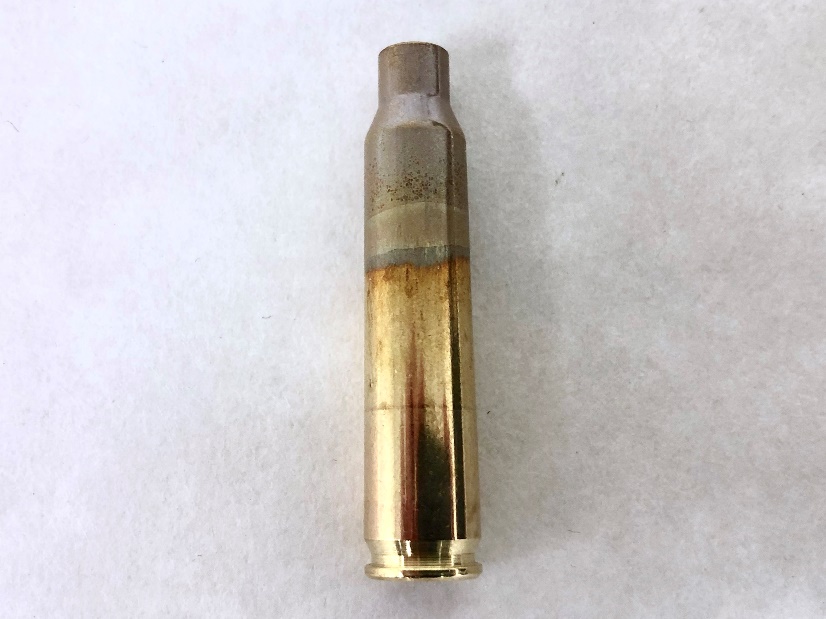
8 seconds @ 550°C
Because of the importance of these tests we decided to section all cases so that we could measure the hardness from the case mouths right back through the shoulder and into the body. The sections all were prepared by METLAB, an Auckland consulting metallurgy laboratory.
This is where we found a significant anomaly. While the neck region of the cases when measured showed no hardness indications below 120HV, it was observed that extended insertion in the salt bath caused the shoulder and body to soften further.
The case inserted for 8 seconds at 550°C showed a distinct softening at positions 7 and 8. Referring to the "Hardness test positions" figure above these positions relate to the case body just after the shoulder junction. Softening the brass in this area is exactly the opposite of the required result.
Next, we tested a 223 R case at 550°C for 20 seconds. As can be seen, the discoloration as as result of the extended time, has extended well beyond normal. It was still only inserted into the salt bath to the same depth 5 mm past the shoulder.
20 seconds @ 550°C
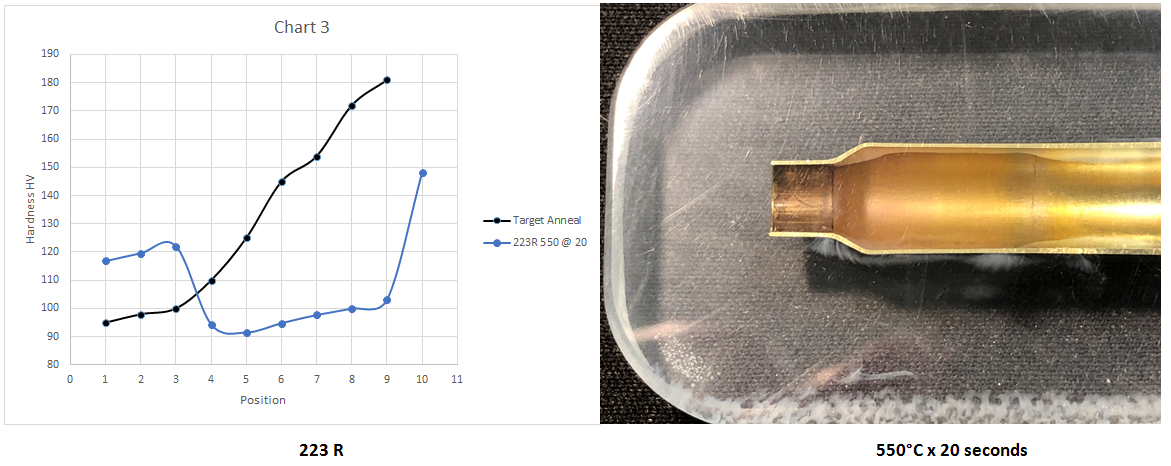
Neck hardness was still observed at 120HV, again not consistent with the results in Chart 1 above, but the shoulder and body were now much softer than virgin brass. This is simply not an acceptable outcome.
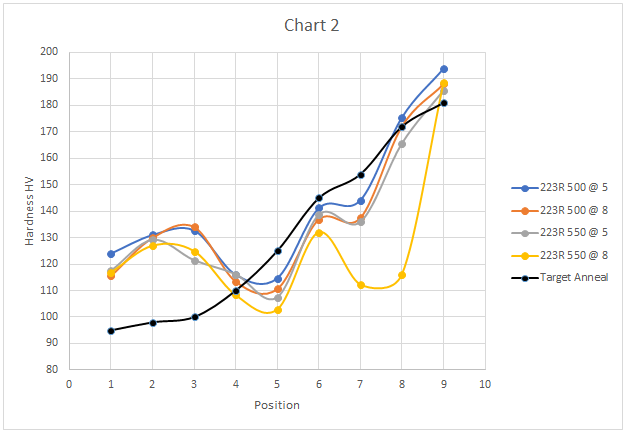
We wanted to test different calibers to see if the anomaly was observable in other cases with different dimensions. We then tested 270 WSM and 308 W cases, always using the maximum 550°C temperature, and inserting the cases for both 5 and 8 seconds.
These are the results:
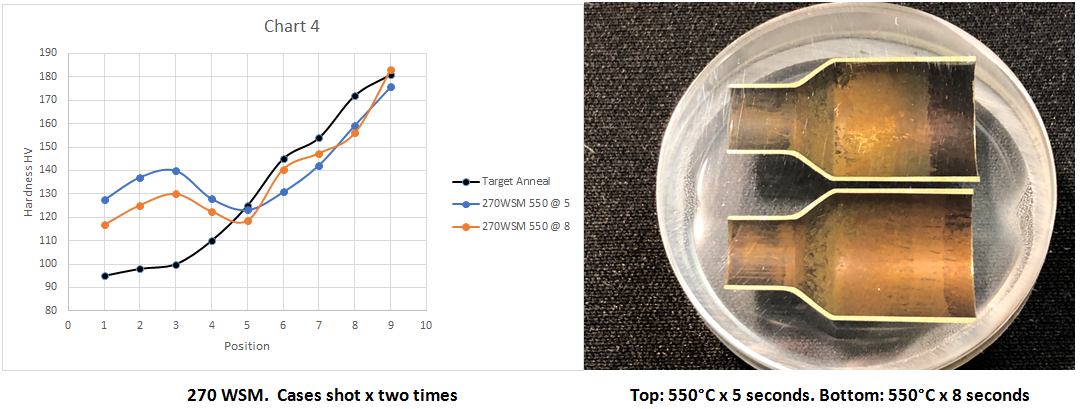
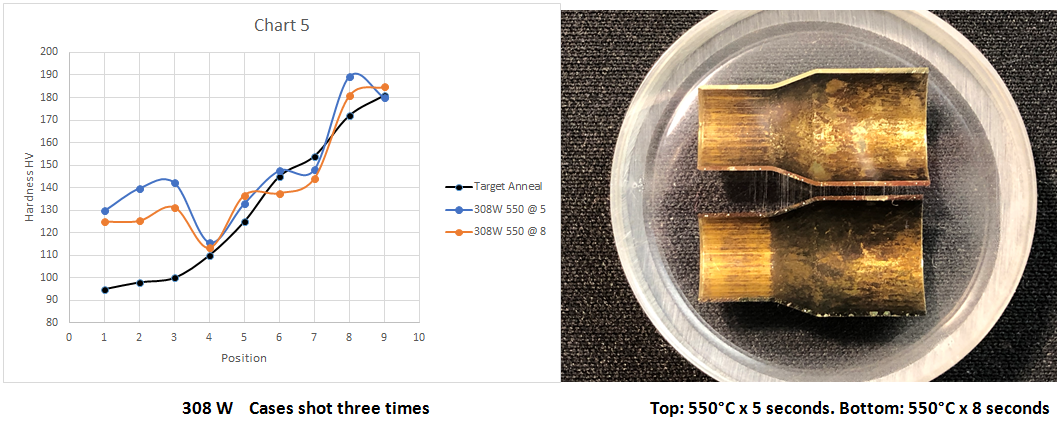
As shown by the charts above, we found none of the cases tested yielded results which could be considered optimal or near the target hardness of 95HV-100HV. Effectively all the case necks we tested were only partially annealed.
Next, we tested some very hard 308 cases. These had been shot seven times and never annealed. These are the results:
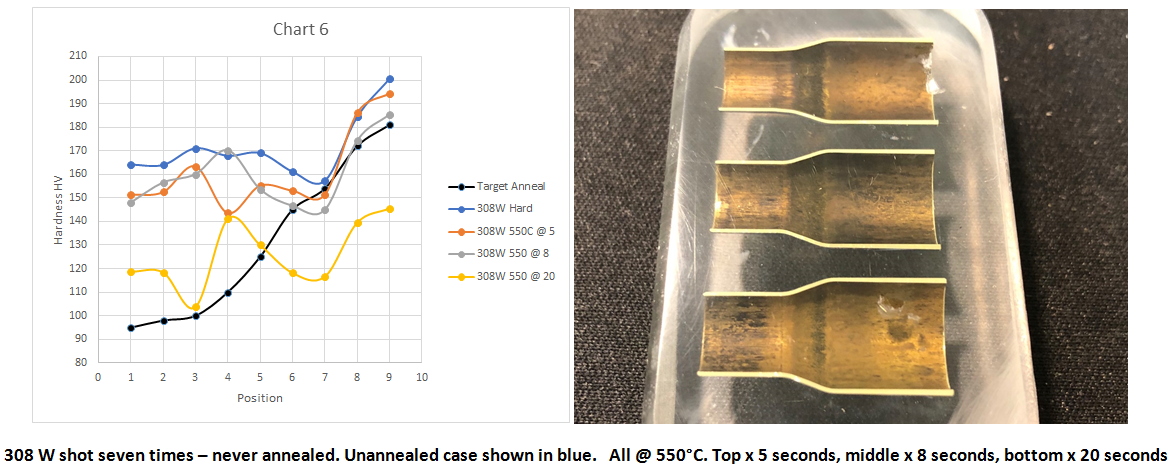
For this test we included the sectional hardness of an unannealed case from the same batch, shown on the graph in blue. As can be seen, the cases inserted for five and eight seconds barely changed hardness. The 20 second case did soften somewhat at the neck (although not to an optimal level), but is also softened considerably in the body.
Conclusion
In the course of this study we tested a variety of cases, used multiple temperatures, and multiple times of insertion into molten salt.
In these tests we observed that none of the cases submerged into the molten salt solution yielded optimal annealing results in the neck region. Increasing the time of insertion to 20 seconds still showed almost no reduction in hardness measured. Instead a major reduction in hardness in the body of the case after the shoulder area was observed in these cases. We do not believe that any combination of temperature and time can overcome this fundamental flaw.
Repeatable, transparent research:
The essence of research is that it is repeatable and transparent. If the above tests are repeated in another laboratory using the same procedures, then the same results will be attained within a nominal margin of variation.
Summary of molten salt bath annealing:
PROs:
When inserted into the 550°C bath for 5 – 8 seconds, the cases 'look' terrific – just like they have been annealed. Even just 2 seconds immersion gives a great looking result. This gives the illusion of annealing.
CONs:
1.
At best, all case necks were only partially annealed. Even using 550°C for 8 seconds, no case necks tested annealed softer than 120 HV, which is much harder than desirable.
2.
Even when an insertion time of 20 seconds @ 550°C was used, necks were not correctly annealed. The case bodies, however, were over-annealed.
3.
The process is HAZARDOUS. For those determined to try it, the following articles should be read thoroughly. This link is an industry guide to the safe use of molten salt baths. It doesn’t even contemplate domestic use.
What is the point of taking on all that risk, when the results are so poor? There are several ways to achieve correct annealing. Molten salt bath "annealing” isn’t one of them. For those reloaders considering getting started on annealing, and who are on a budget, we would recommend a gas flame-based option.
A final note: none of the above is a reflection on the performance of the Lee Electrical Melter. It is, no doubt, a fine piece of equipment for its intended purpose.
Molten Salt Bath Annealing Report Addendum
Since we released this article, a number of issues have been raised on various forums. We address them as follows:
- "What if I insert just the case neck into the salt bath? Will that anneal correctly”? We tried this using three times shot Lake City 223 cases. Prior to insertion the necks were 155 HV. The salt bath was 550°C. First case was inserted for 8 seconds just past the neck/shoulder junction (point 4 on the Hardness Test Position diagram above). There was zero change in hardness – still 155 HV. Next, we did the same thing for 20 seconds. Still no change. Zero. We expect that the body of the case is acting as a heat sink. The neck simply doesn’t get hot enough for anything to happen.
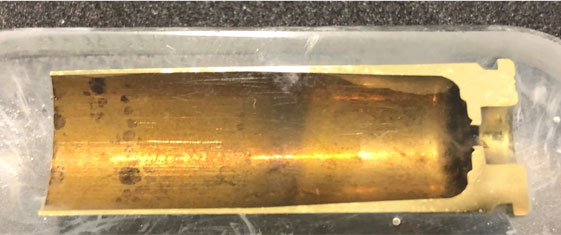
- "That in a salt bath, it is impossible to have the shoulder and body anneal softer than the neck. Therefore, AMP results are wrong”. As mentioned in the "Executive summary”, the study tested bottle-neck cases. We have now tested a straight wall case (Federal 50 Smith and Wesson) which gave quite different results. This case was inserted into the bath to a depth of 19 mm from the mouth. Temperature was 550°C x 8 seconds. We did this to test the annealing as far along the case as possible. The test case was very hard to start with – 210 HV near the mouth. These are the results:
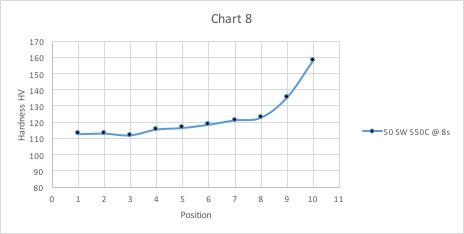
Although still slightly too hard, a very even, progressive anneal was achieved.
50 SW case
Note: on this case, measurements were taken every 2 mm from the mouth.
So, what does this mean? Firstly, this is just one case, so it is not enough data for an informed conclusion. For what it is worth, this is one hypothesis: this straight walled case has a consistent surface area inside and out. Therefore, it appears to be heating up uniformly within the salt bath. Bottle-necked cases have variable surface areas along the length of the cases. The larger surface area portions (body and shoulder) may heat up quicker than the neck. Just a guess.
- "That there must have been variable temperatures in the AMP test salt bath”. If this is an issue it would affect all users. We very much doubt it is a factor. Moving the thermocouple around didn’t show significantly hot or cold spots. We had as stable temperatures as the electric melter was capable of. See above.
- "AMP’s insertion depth into the salt bath was wrong”. Some said "too shallow” some said "too deep”. We just followed the instructions (such as they are) on the videos. There is no great emphasis placed on depth anywhere we can see. We used 5 mm of body past the shoulder. We think any tinkering with this would make little difference. Also see point 1 above.
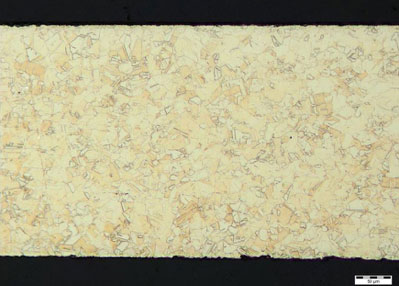
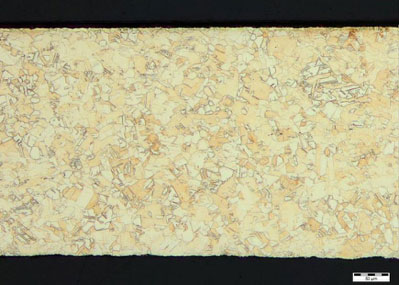
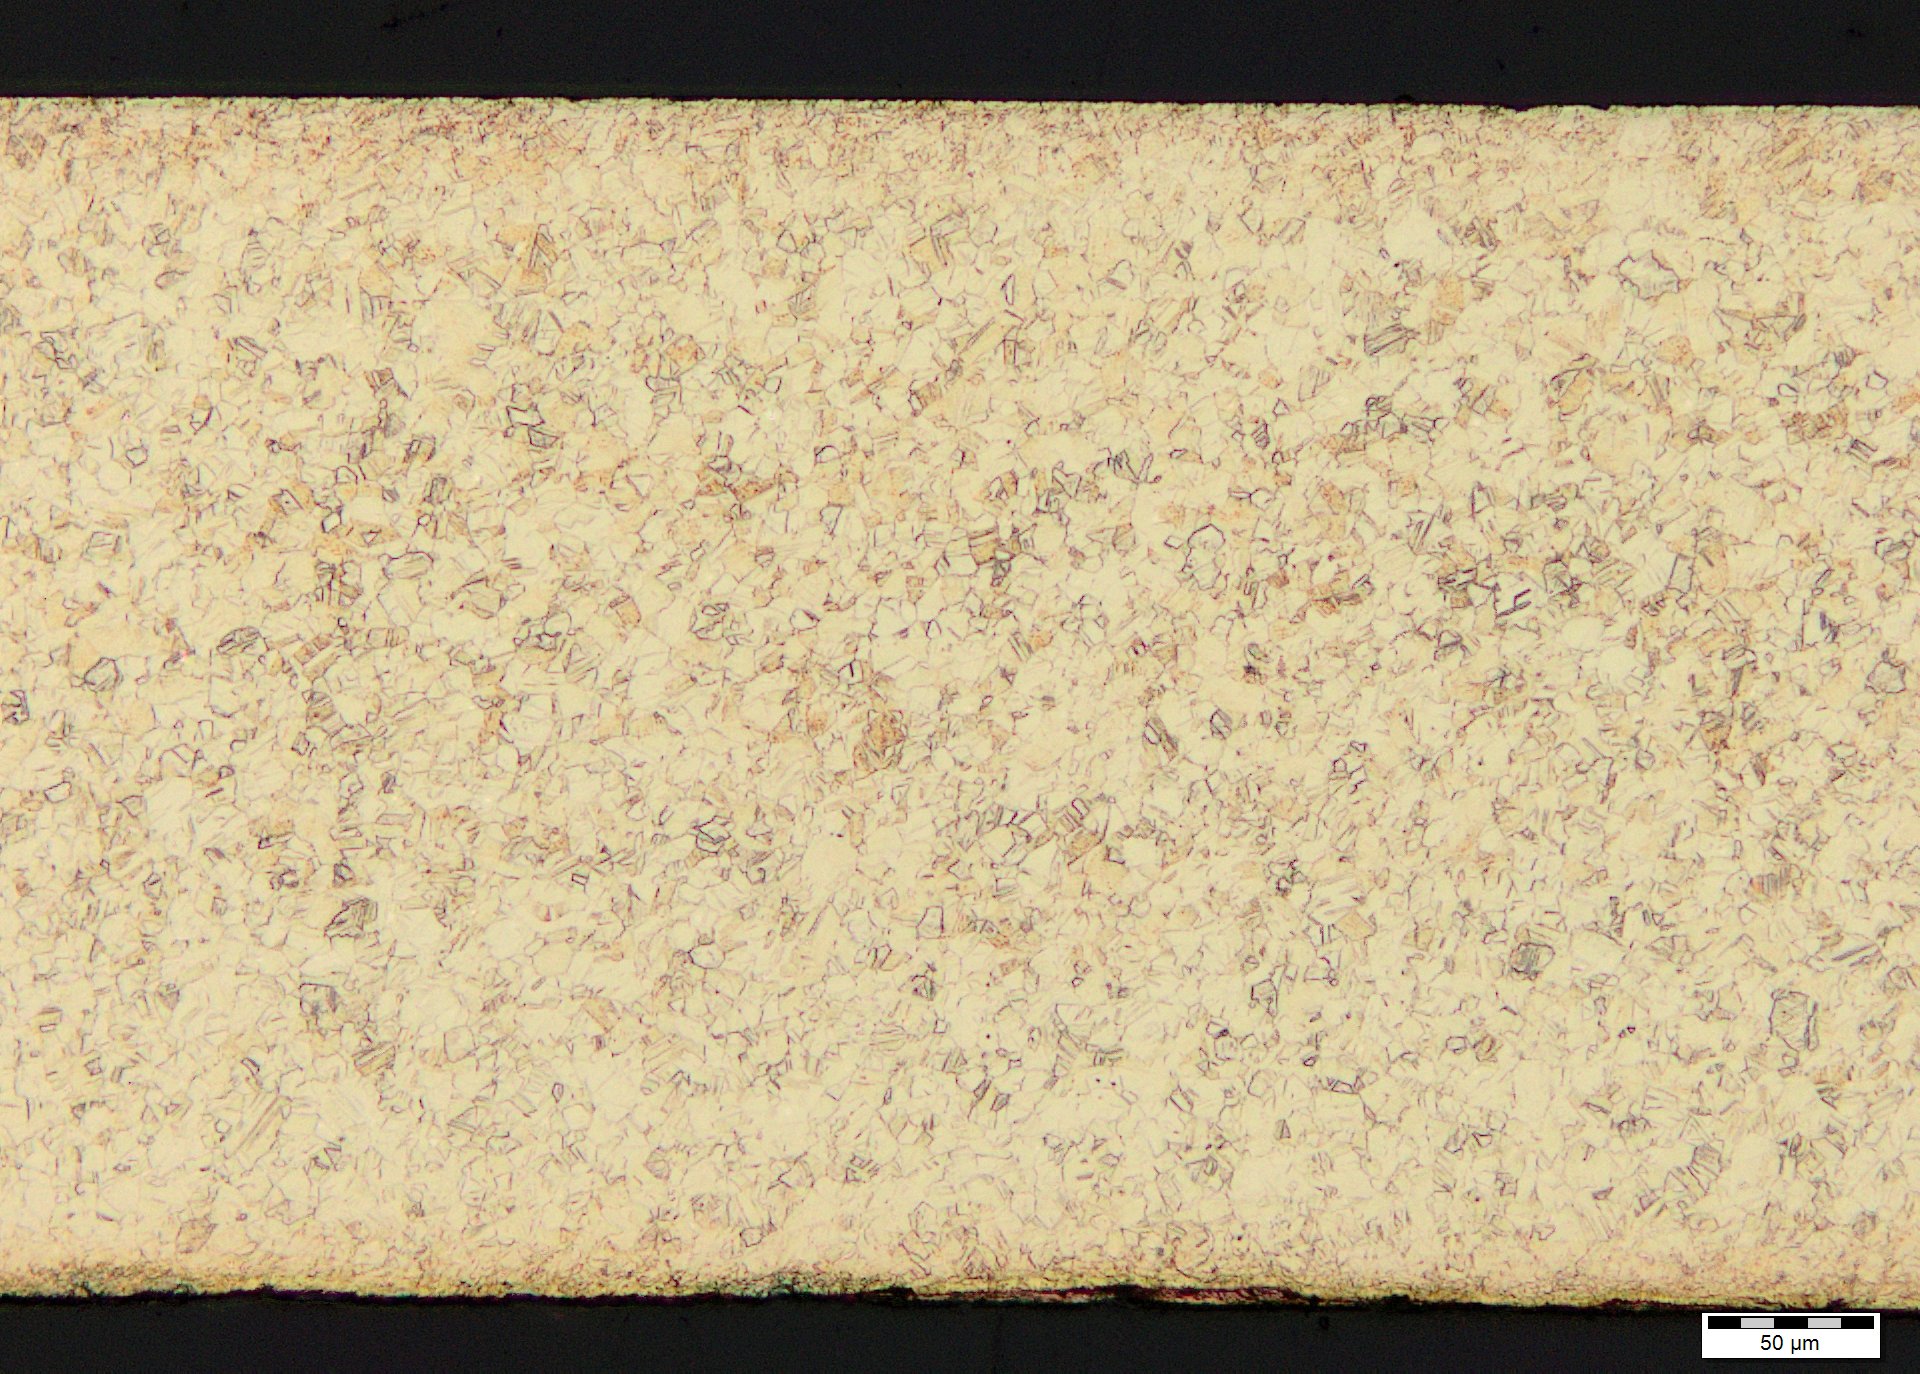
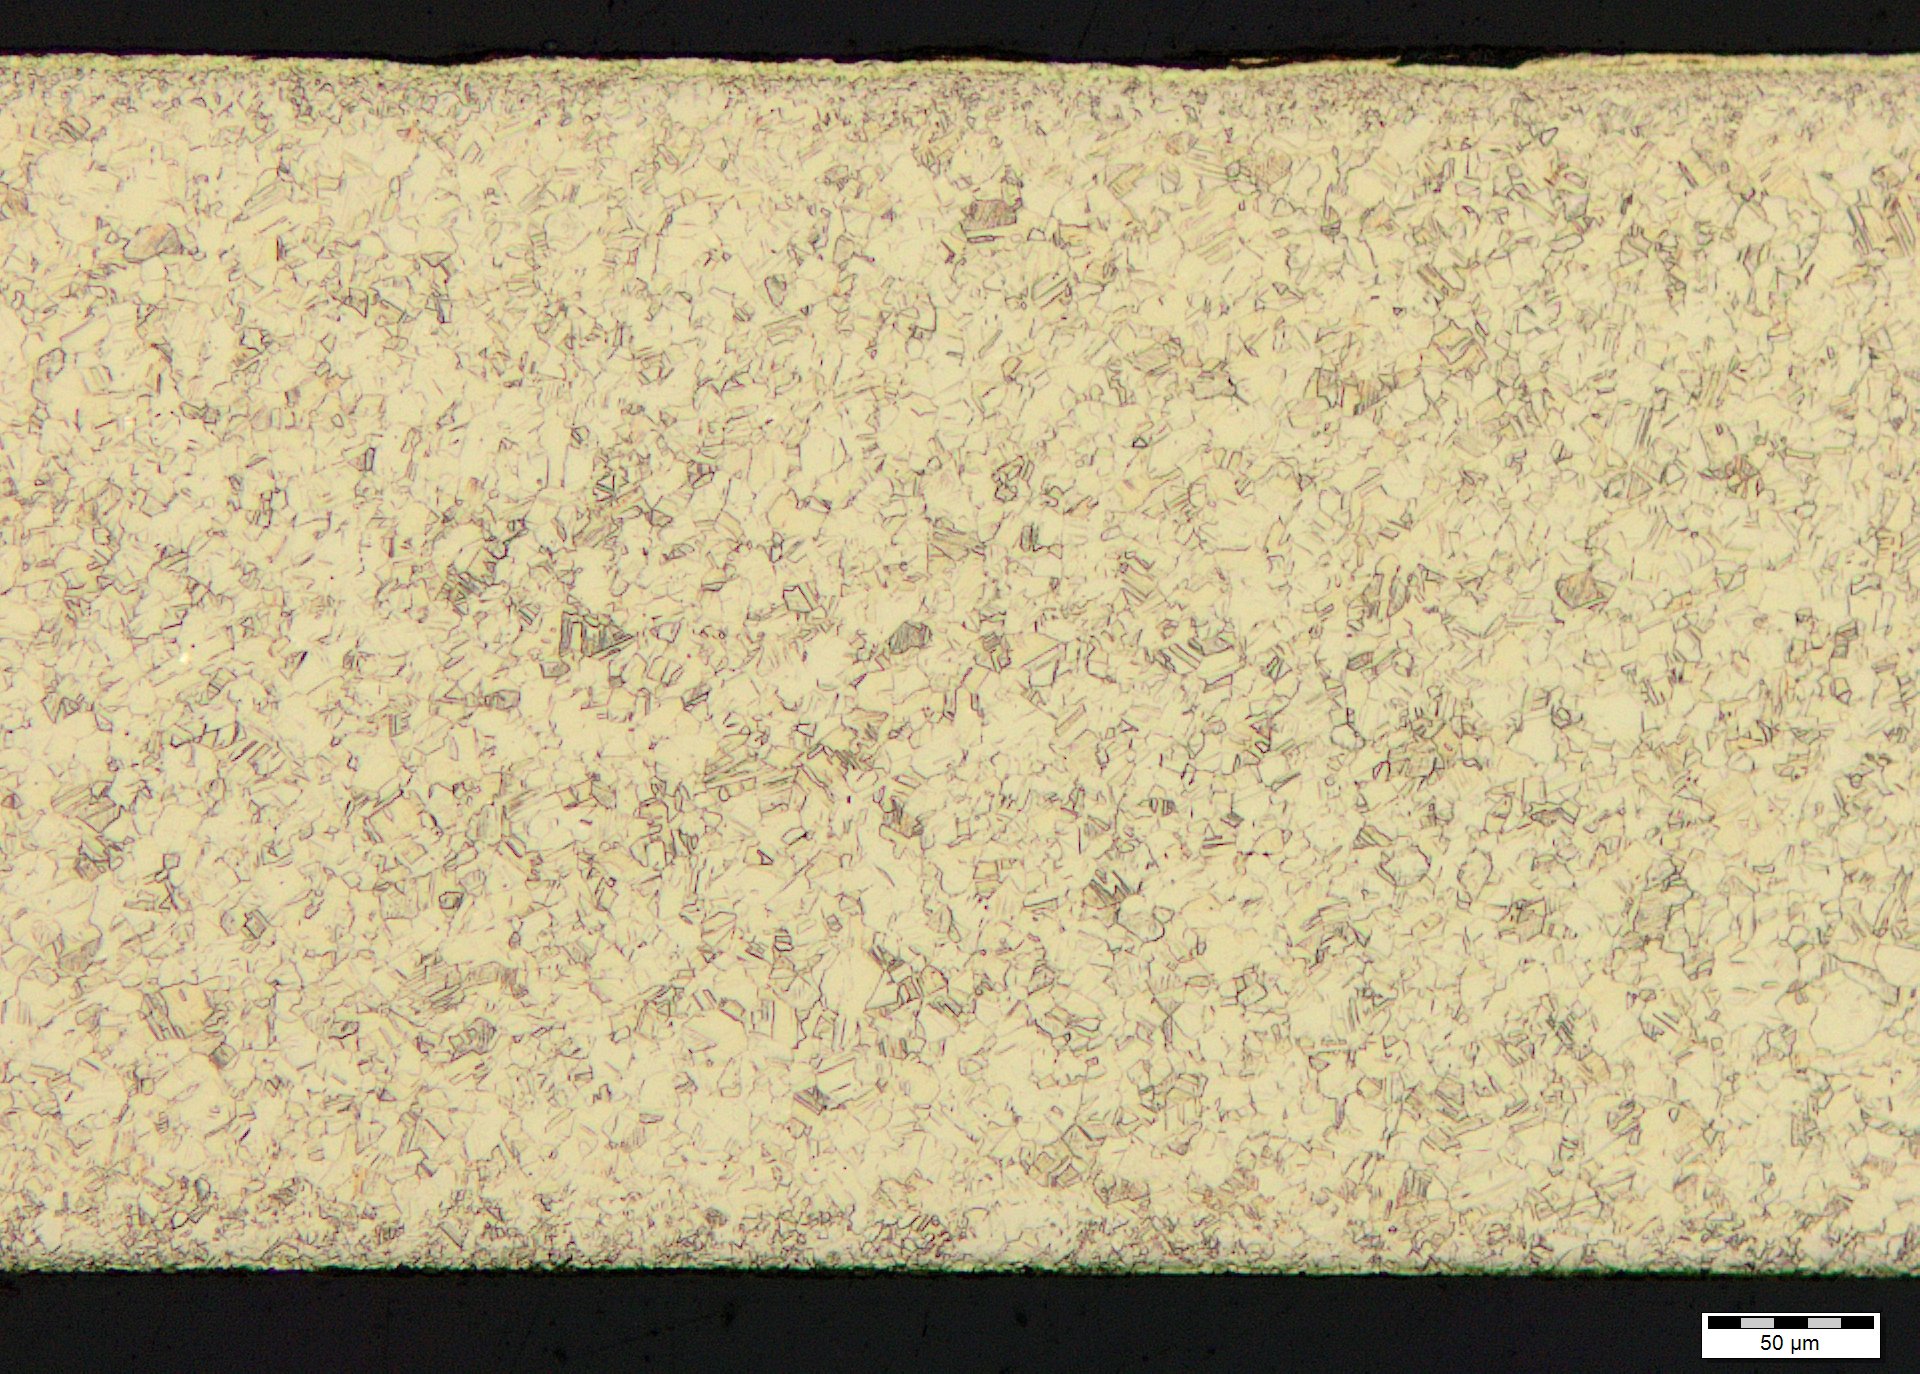
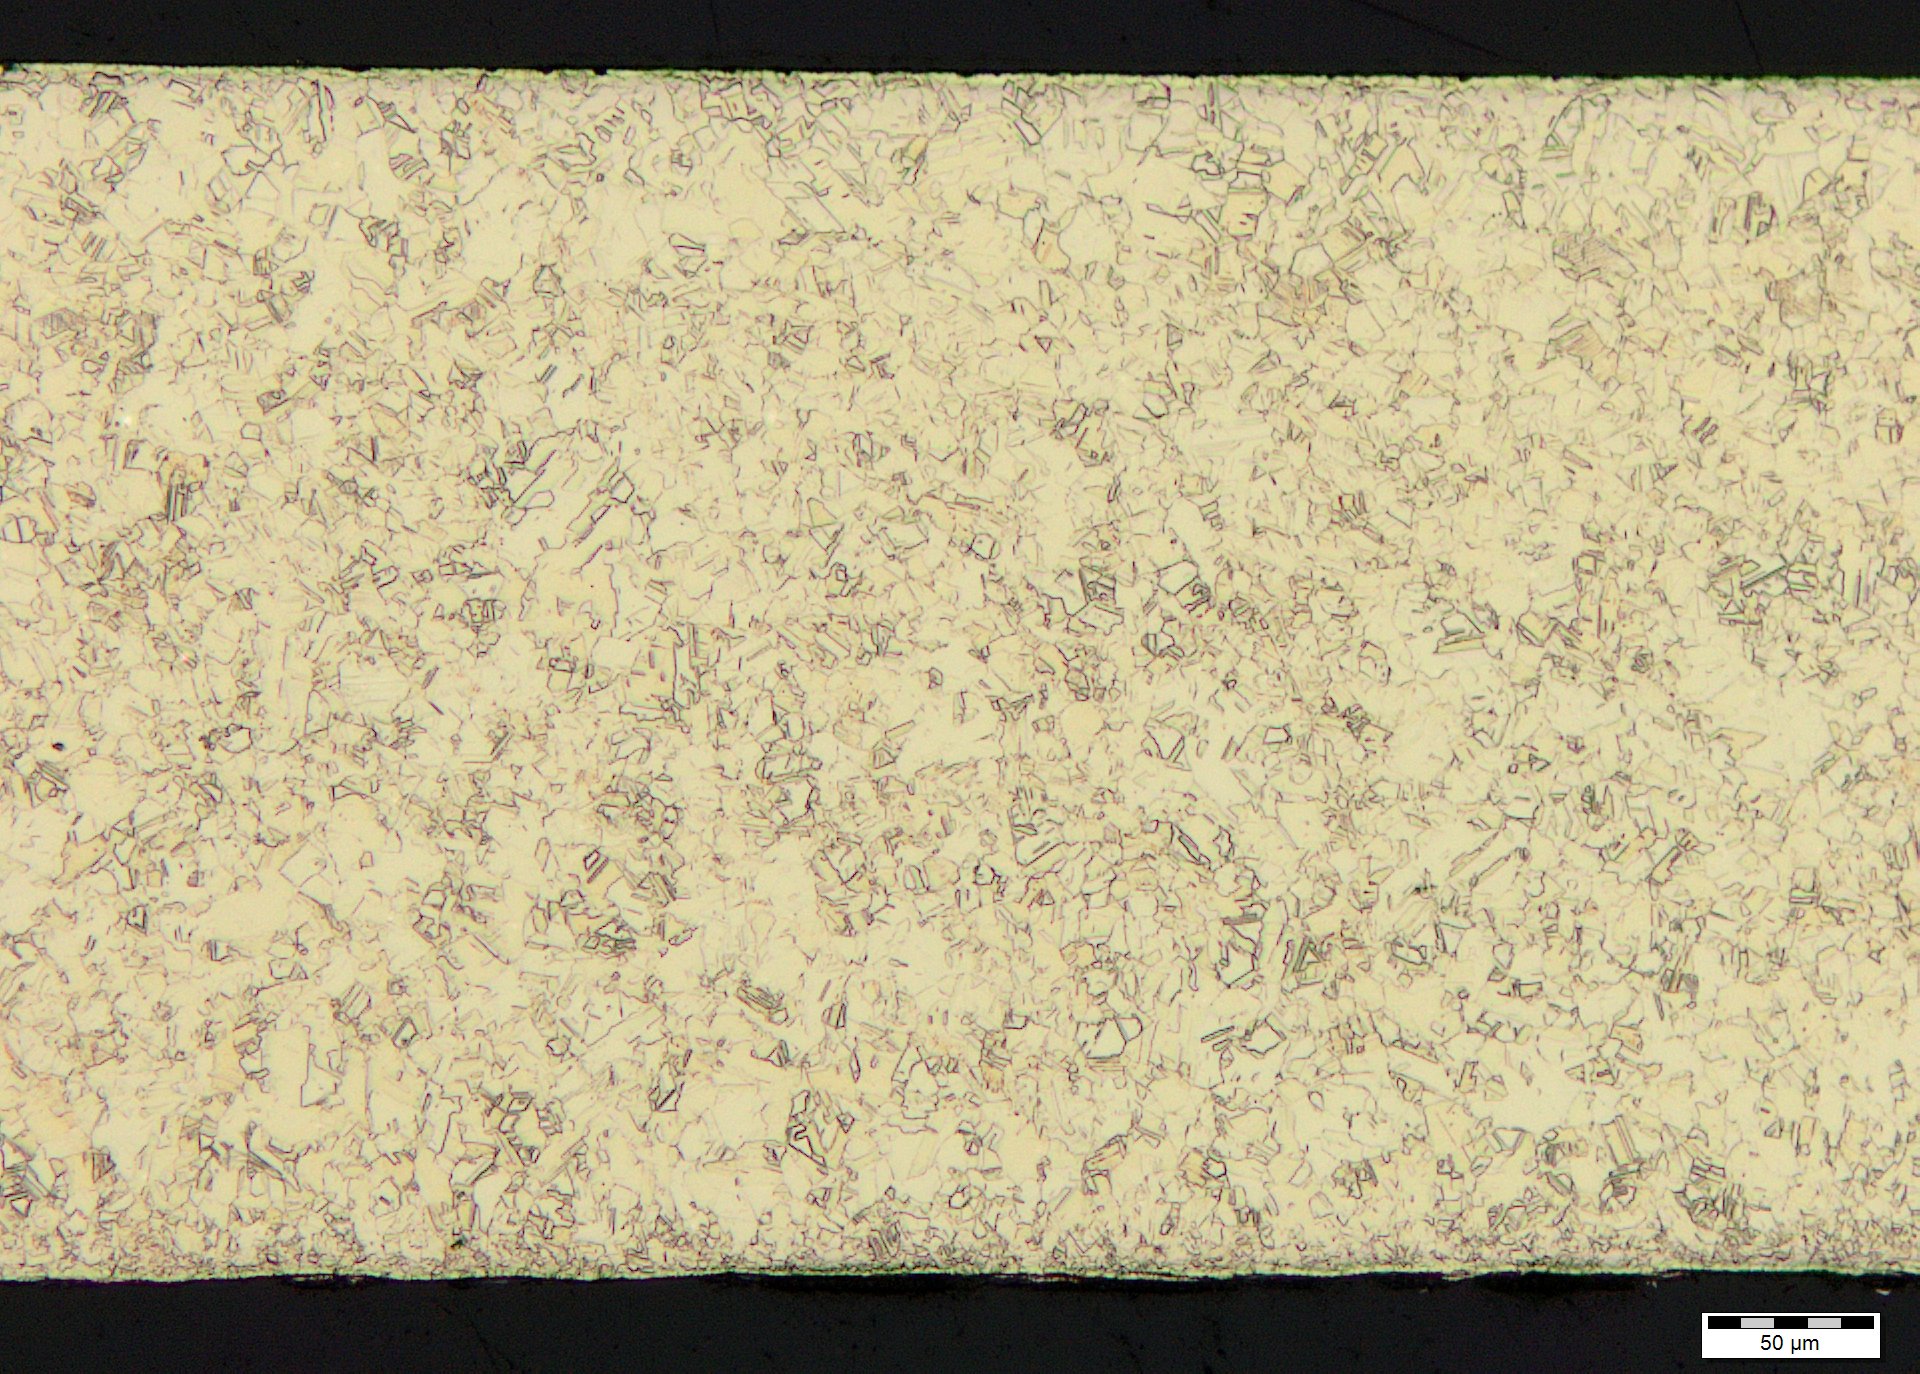
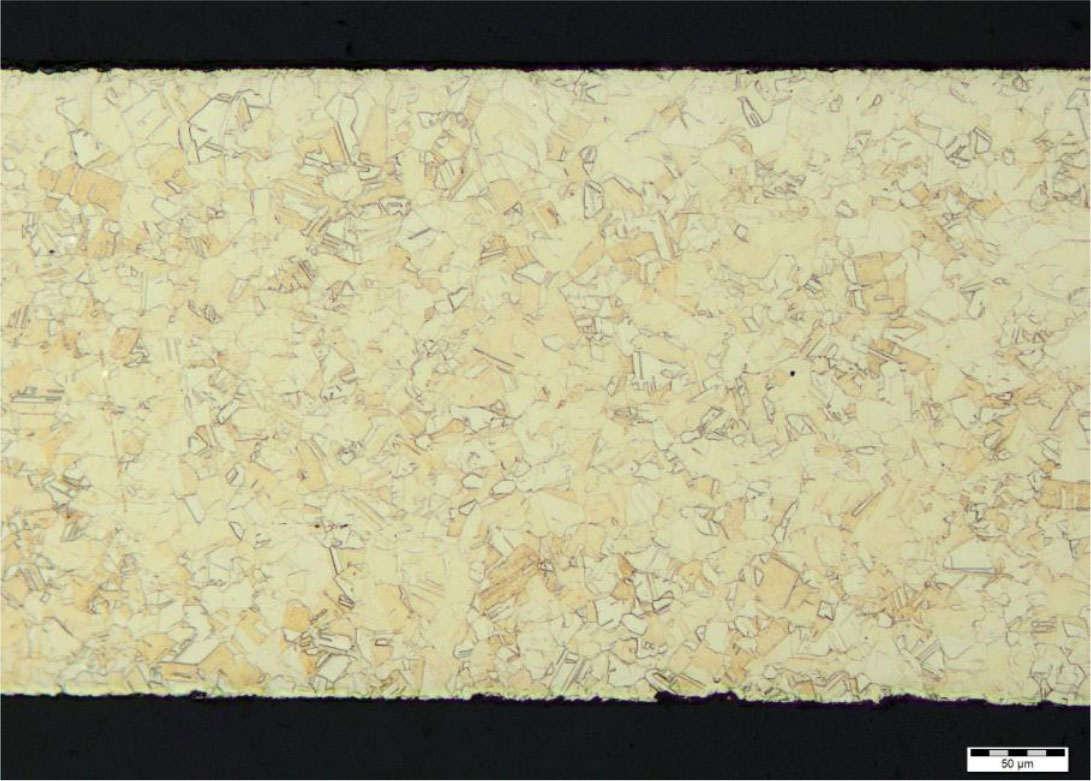
- "That hardness isn’t what matters anyway. Grain structure is what really matters for annealing”. To clarify this point, we asked Andrew Ouwejan from Metlab to polish the 308 samples shown in Chart 6 of the study. He then produced the following micro analysis for us. These photos are at the middle of each neck. These are the results:
All images are X 200 magnification.
(click images to enlarge)
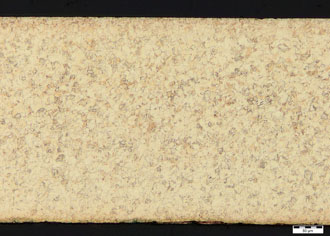
Un-annealed 308 W from Chart 6 (blue line - hard) 165 HV.
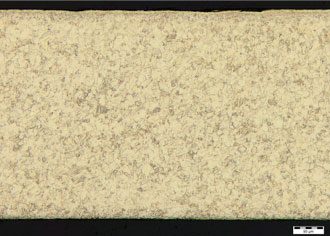
Chart 6 (orange line) 154 HV 550°C x 5 seconds.
Chart 6 (yellow line) 119 HV 550°C x 20 seconds.
Andrew comments as follows: "For the 308 cases heated in the salt bath, there is no visible difference between the grain structures in the neck region of any of the cases examined. The necks have not been hot enough cause any grain growth”.
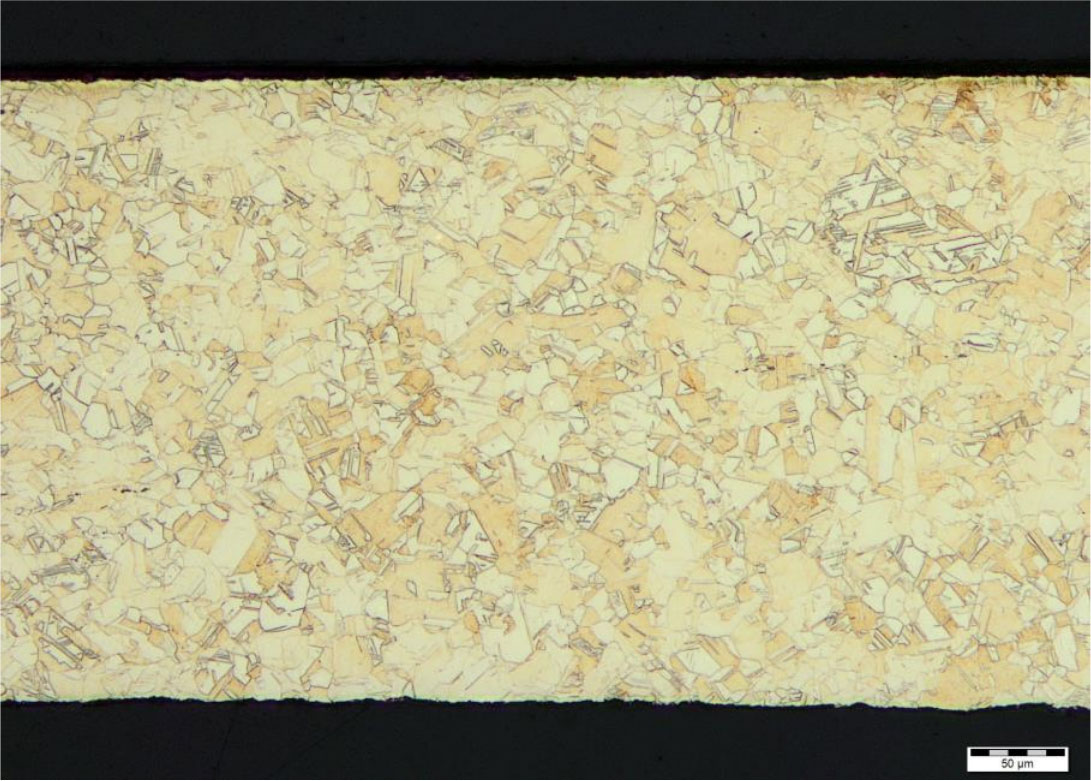
We then compared these micros with similar 308 W samples from our 2017 "Annealing under the Microscope Part 1”. At the time these samples were prepared to determine if there was any "creep” after multiple reloading and annealing cycles. As can be easily seen, the grain structure is much larger.
308 W three times shot and AMP annealed each reload
308 W ten times shot and AMP annealed each reload
Andrew again comments: "The grain structure shown in these two samples indicates that full annealing has occurred involving recovery, recrystallisation and grain growth”. The full Metlab reports form Appendices 1 and 2 of this 2017 study can be viewed here:
https://www.ampannealing.com/articles/40/annealing-under-the-microscope/ The reports contain an excellent explanation of the annealing process, including hardness and grain structure. - "That we don’t know what ‘correct annealing’ really is”. We beg to differ. We have never been afraid to admit mistakes. That is how we actually improve our processes. For example, when we were developing the AZTEC system, we got a few complaints from several customers who are really top-level ELR Match guys. They started getting velocity ES creep with several cartridges. We got them to send us samples for analysis. Turns out they were fractionally under-annealing - only to about 110 HV. We adjusted the relevant AZTEC pilot code values for a softer anneal (98 HV). The customers then reported a return to beautiful ES again. To say "Any annealing is OK” is just wishful thinking – certainly if accuracy is the goal. Part of the reason why brands like Lapua and Peterson are so highly valued by reloaders is the precision with which they anneal at the factory.
- "AMP is just biased”. Towards the end of the paper we say: "The essence of research is that it is repeatable and transparent. If the above tests are repeated in another laboratory using the same procedures, then the same results will be attained within a nominal margin of variation". We stand by that statement. We didn’t just get a few "outliers” and publish those. We did a lot of testing, and the results of salt bath "annealing” of all bottle-neck cases were consistently poor. Another laboratory doing the same tests with micro Vickers equipment will get the same results. Note: Rockwell testing is not appropriate for thin wall brass sections. We understand that several people are planning on having their own tests done. We applaud that. In order to ensure their tests are valid, we have a provided a guideline below. *
Summary of Addendum findings
Our additional findings confirm the initial report tests. Even at 550°C x 8 seconds or more, insufficient temperature was applied to the necks of all bottle-necked cases we tested by salt bath heat treatment for correct annealing to take place. In most cases, there was very little or no annealing to the necks. With the 308 cases tested in Chart 6, there was also virtually no annealing at all of the shoulders and bodies inserted for 5 or 8 seconds @550°C. This is confirmed by both hardness testing and examining grain structure.
Because the 50 S&W case did anneal evenly, this tends to confirm that variable temperatures in the salt bath are not a factor in creating variable annealed hardness along bottle-neck cases. Rather, this test possibly shows that variable surface areas of bottle-neck cases affect the rate of heat absorption. The 50 S&W tests also show that it is possible for salt bath heat treatment to result in an acceptable anneal of a straight walled case. There is no molten salt bath "one temperature/time” combination which will provide universal correct annealing to all cases, even straight walled cases. Hardness testing would be required to determine the correct combination of time and salt bath temperature for different straight walled cases. If the "Variable Surface Area” hypothesis is correct for bottle-necked cases, then even if a much higher temperature was achieved, so as to anneal the necks correctly, then the shoulder and body would necessarily have to be over-annealed.
* Guide to valid test procedure.
- Use a certified metallurgy laboratory which will provide a signed report.
- Ensure that each sample of each batch of samples is clearly identified.
- Record the test details i.e. salt bath temperature, time of insertion, depth of insertion.
- Ensure that each batch starts from the same baseline i.e. they all have the same reloading history - times shot and sized etc.
- Provide a "control” sample for each batch to the laboratory which has no heat treatment. Test the untreated hardness at each test position.
- Test the heat-treated samples at the same positions and compare to the "control” sample.
- We suggest Micro Vickers hardness testing only, but for an extra cost, grain structure can also be examined.